Replacing a shower valve takes 2–4 hours and costs $150–$350 for parts, depending on the valve type. You’ll need to shut off the water supply, remove the handle and trim plate, swap the cartridge or valve body, and test for leaks before reassembling.
If your valve is leaking behind the wall or your shower runs hot and cold on its own, it’s usually the cartridge, not the full valve, that needs replacing.
Not comfortable doing it yourself? A licensed plumber typically charges $200–$400 for this repair, and it may be covered under your home warranty.
Your shower just betrayed you again. You are ready for a relaxing shower after a long day, but the water keeps flipping between too cold and too hot. Frustrating, right? Learning how to replace a shower valve might be exactly what your bathroom needs.
A lot of homeowners assume valve issues mean it’s time to call in a plumber. But you’ll be happy to know that replacing a shower valve cartridge is actually a task many DIYers can handle.
In most cases, it is just a worn-out cartridge tucked behind the shower handle. That small piece does all the work, managing water flow and keeping the temperature steady.
This step-by-step guide lays out the process in simple terms with no unnecessary complexity or technical confusion. So, ready to fix that shower and get that water flowing the way it should? Let’s begin.
Over time, even the most reliable shower valves wear out, especially the cartridge inside. This small part is usually made of brass and plastic, and when the rubber seals inside begin to fail, problems start showing up.
If low water pressure is happening alongside slow drainage or standing water, the issue may not be limited to the shower valve alone. In that case, these tips on how to unclog a drain in 5 ways may help you troubleshoot the problem before replacing the valve.
If you are ticking off more than one of these signs, it may be time to replace the cartridge.

Before learning the process of replacing shower valves, it is helpful to know exactly what type you are dealing with. Not every type fits the same mold, and choosing the wrong one can drag out what should have been a quick job.
Not sure what yours is? Here is a quick breakdown to help you figure out what you are working with.
Before you start replacing that shower valve cartridge, you should take a minute to gather everything you’ll need. It becomes a whole lot easier when you are not running back and forth mid-project.
Below is the list of tools you’ll need:
Materials:
Pro Tip: Take a photo of your current valve and cartridge before heading to the hardware store. Better yet, bring the old cartridge with you; most hardware stores will match it on the spot.
Wondering how long does it take to replace a shower valve? This quick guide breaks it down into five easy steps you can tackle in just 1 to 3 hours.
With the right tools and a bit of patience, you can get your shower back in working order without calling a Pro. Now, let’s understand and go through each step so you know exactly what to expect.
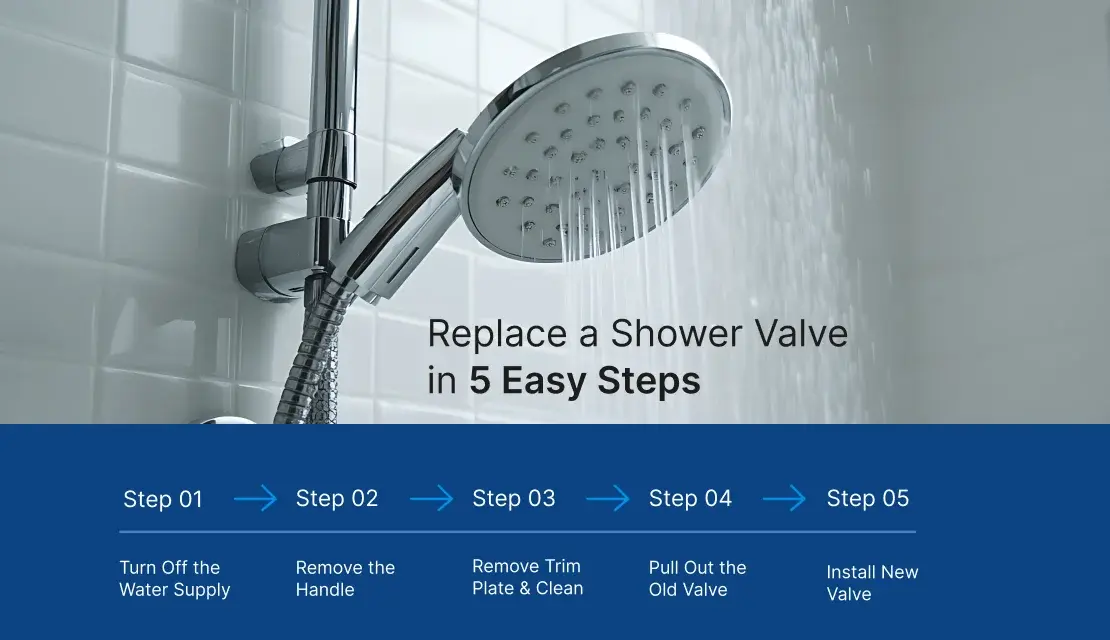
Before anything else, make sure the water supply is off. If your shower has a dedicated shut-off valve, that will make things easier. If it doesn’t, you’ll need to close the main valve for the house. Once that is done, go ahead and turn on the shower to let any water still sitting in the pipes drain out.
Then grab a rag or towel and cover the drain opening. This keeps tiny screws, washers, or tools from slipping into the drain and disappearing mid-repair. You’ll thank yourself later.
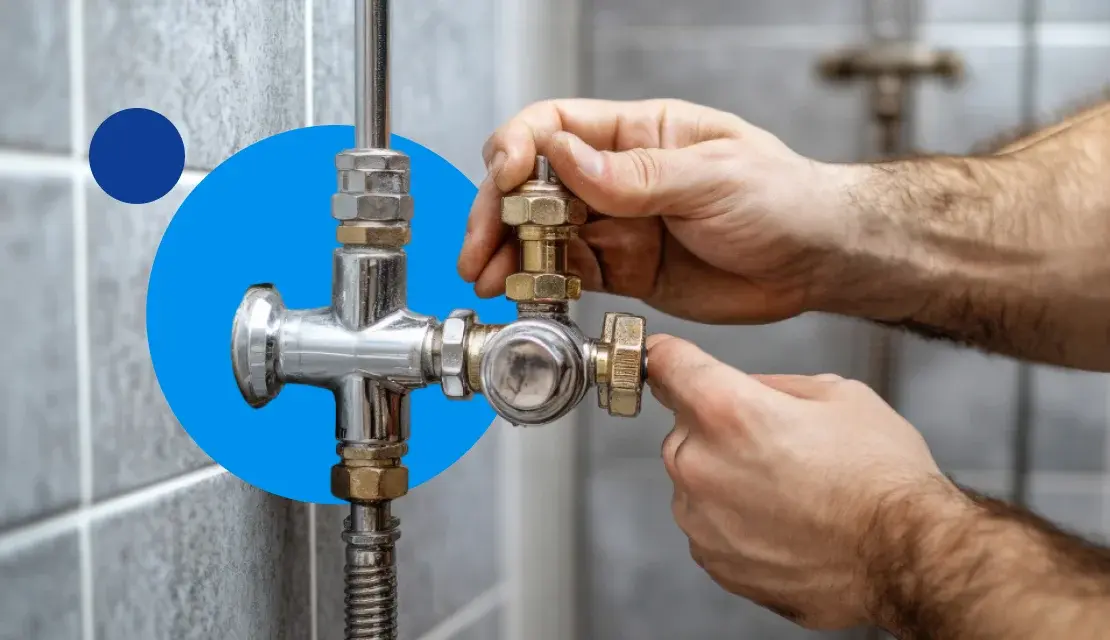
Now that the water is off, it is time to get access to the valve. Most shower handles are held in place by a tiny set screw, usually tucked underneath the handle. Take a quick look to see if you will need a hex key or a standard screwdriver.
Once you have got the right tool, loosen the screw and then carefully slide the handle off. Be careful not to drop any small pieces. Toss everything into a cup or bowl so you are not hunting for screws later. Removing the shower handle is a very basic but crucial step when learning the shower valve replacement process correctly.
Now that the handle is out of the way, it’s time to deal with the trim plate, that flat piece sitting flush against the shower wall. Use a screwdriver to remove the screws securing it. Once loose, pull it away carefully.
You will probably see some old caulk or grime stuck behind it. Take a few minutes to scrape off the leftover sealant and wipe the surface clean. If you are planning to reuse the same trim plate later, this cleanup step helps it sit properly when it goes back on.
If the old seal around your shower is cracked or peeling, take a few extra minutes to remove and replace it before reinstalling the trim plate. Learning how to caulk a shower can help prevent moisture from getting behind the wall and causing future water damage.
If you are just swapping out the cartridge, the job is a bit easier. Pull the retaining clip with needle-nose pliers, loosen any screws or nuts holding the cartridge, and slide it out using groove joint pliers.
However, if the entire valve needs to be replaced, you’ll require a bit more space. You may need to widen the existing hole or access the valve from the opposite side of the wall. Once exposed, grab a pipe cutter and carefully cut the hot and cold water lines, plus the pipe leading to the showerhead.
Installing a new cartridge is easy. Simply slide it into the valve, secure the clip, and tighten any loose components as needed.
Full valve replacement takes a bit more work. After checking your measurements, dry-fit the valve to make sure everything lines up. Clean the pipes and fittings, apply your flux, then heat the connections while feeding in the solder. This part requires a steady hand and some experience with a torch. If you are unsure, it’s totally fine. It’s a good idea to bring in a plumber, especially if you are learning how to replace a shower valve for the first time.
Once your new valve is in place, restore water flow and check for any leaks around the connections. If it is all good, go ahead and reinstall the trim plate and handle. Then, turn the shower on and make sure everything is working right.
If the thought of opening up your walls isn’t appealing, that’s completely fair. A home warranty means you just make one call, and an experienced plumber handles the repair; you only pay the service fee.
DIY shower valve replacement works well in straightforward situations. But call a licensed plumber if:
In any of these cases, a licensed plumber is the right call. If your home warranty covers plumbing repairs, then labor is covered; you just pay the service fee.
Ignoring small plumbing issues can sometimes lead to moisture buildup, hidden leaks, or damage behind walls over time. Even a minor valve failure can create bigger repair concerns if water spreads beyond the fixture itself. So, it’s equally important to understand how a home warranty covers water damage, especially when plumbing leaks lead to larger repair issues.
Plumbing repairs are one of the most common home warranty claims, and one of the most expensive without coverage. Select Home Warranty covers your pipes, valves, and fixtures, so a repair call doesn’t turn into an emergency bill.
If you are doing it yourself, expect to pay between $20 and $350 for the valve, depending on the type and brand. Cartridges alone usually cost $10 to $85. Hiring a plumber will cost about $225 to $575 and may vary a little depending on site conditions, plumbing accessibility, and the type of shower valve.
In most cases, it’s just the cartridge that needs replacing, not the entire valve body. If your shower runs too hot or too cold, drips when off, or has uneven pressure, the cartridge is the likely culprit. The full valve body only needs replacing if the valve housing itself is cracked, corroded, or leaking behind the wall.
Replacing a shower cartridge is a manageable DIY project for most handy homeowners; it requires basic tools and about 1–2 hours. Replacing the full valve body is trickier because it may involve cutting into the wall, soldering copper pipes, or working with the main water shutoff. If you’re not comfortable with plumbing or your walls need opening, a licensed plumber is the safer choice.
Yes, plumbing coverage in most home warranty plans includes shower valves and cartridges when they fail due to normal wear and tear. The process is simple: call your provider, pay the service fee, and a licensed plumber handles the repair. It won’t cover cosmetic parts like handles or trim plates, but the functional valve components are typically included.
A quality shower valve typically lasts 20–30 years with normal use. Cartridges inside the valve may need replacing sooner, usually every 7–15 years, depending on water quality and usage. Hard water areas tend to wear out cartridges faster due to mineral buildup.
In many cases, yes, you can swap out the valve cartridge or trim without damaging your tiles. Some homeowners even use a wider escutcheon plate to cover small wall openings. But if full valve access is limited, removing a tile or two might be unavoidable.
Signs of a worn-out shower faucet or valve include low water pressure, inconsistent water temperature, or leaks. You may also notice that the handle becomes difficult to turn or that both the tub spout and showerhead operate simultaneously. When things go beyond a quick DIY, having a home warranty that covers plumbing systems and leaks can take the pressure off. It covers repair costs, so you are not stuck footing the entire bill.
A steady drip is often due to a worn cartridge, a faulty gasket, or a loose fitting. Try shutting off the water, inspecting the parts for wear, and replacing any damaged components. If the leak persists, you may need to reseal the joints or consider calling a plumber if the issue is more serious.
———————————————————————————————————————————————————–
Disclaimer: The information in this article is intended to provide guidance on the proper maintenance and care of systems and appliances in the home. Not all the topics mentioned are covered by our home warranty plans. Please review your home warranty contract carefully to understand your coverage.
Our blogs and articles may link to third-party sites that offer products, services, coaches, consultants, and/or experts. Any such link is provided for reference only and not intended as an endorsement or statement that the information provided by the other party is accurate. We are not compensated for any products or services purchased from these third-party links.

Don’t wait until it’s too late! Check out our current plans and get your free quote.

Household Tips
Trees and natural growth provide wonderfully aesthetic benefits to the home, but can also severely damage your property if not carefully plotted. Select Home Warranty offers coverage to repair or..

Household Tips
A blown fuse can surprise any homeowner. You may have just plugged in your microwave, turned on the garage light switch or started the radio. No matter the reason, don’t..
Household Tips
Don’t worry, a clogged drain isn’t a reason to use your home warranty unless you notice these troubling signs. We’ll walk you through how to clear a clogged drain in..